PA System Guide – Part 2
This is the continuation of the earlier post about the PA System at Carnatic music venues. This post would make better sense when read as a follow up to the first one.
PDF of this PA System Guide (Click to Download)
PA SYSTEM – A Brief Introduction
In this section, I will concisely introduce the separate elements of a PA system. Each element will be briefly explained, and I will list out some do’s and don’ts which will help reader understands some commonly made mistakes and how to correct them with better practices. I will also point-out some very generic and fail-proof purchase suggestions. (However, these are very flexible given that the market options and prices are forever changing). It is also important to note that proper use of this equipment in a proper space also play important roles in the end goal of good sound.
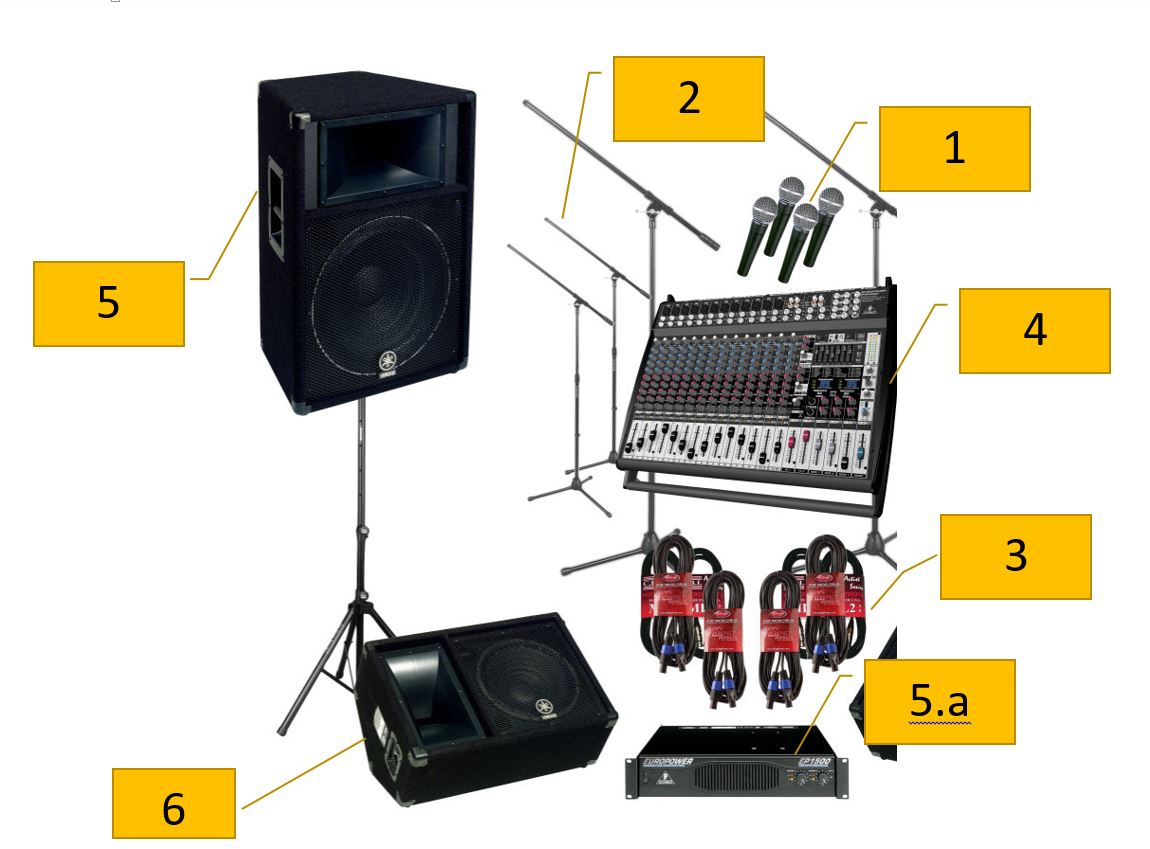
Typical Components of a PA system: (Ordered sequentially based on how sound travels in the chain)
- Microphone
- Stands
- Cables
- Mixer
- Loudspeakers (Powered Speakers or Amp(5.a) + Passive Speakers)
- Monitor Speakers
1. Microphone
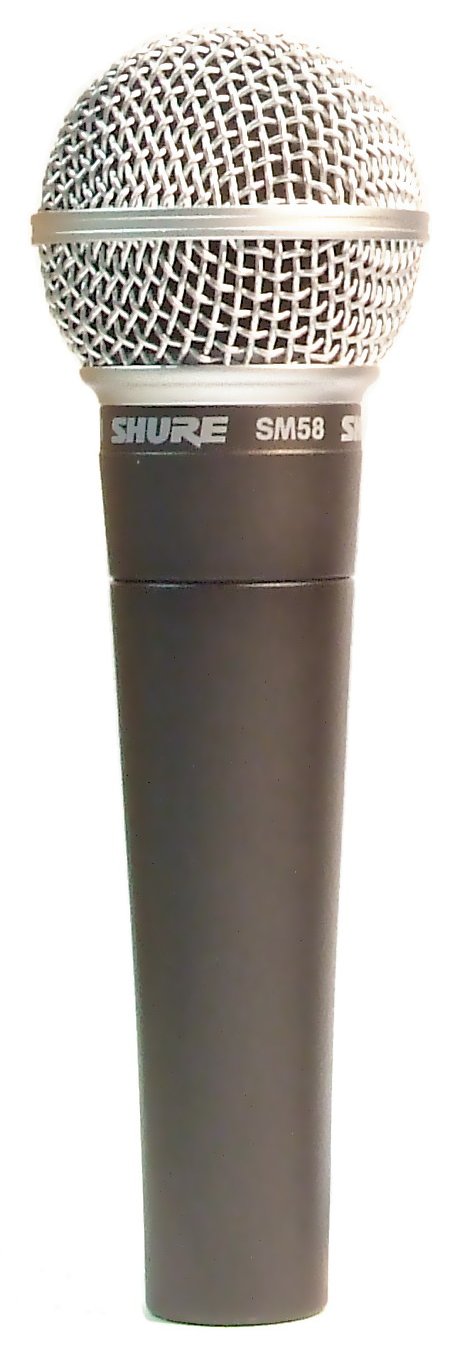
Shure SM-58, A typical Dynamic Mic
It is a device that convert acoustic energy (the voice of the singer, for example) to an electrical signal. This signal can be manipulated in a mixer, amplified and then sent out to the loudspeaker. There are innumerable types of microphones at different price ranges. But the type of mics best suited for live music are called Dynamic Microphones. They are physically rugged and can handle loud sources of sound, and more importantly they have excellent sound rejection qualities to prevent feedback. Dynamic mics can further be divided into two broad types: Instrument and Vocal dynamic types. The purpose for each type is self-explanatory. A good quality dynamic mic can last you decades, even after heavy abuse
Best Practices
• Don’t use poor quality microphones. They don’t last very long and produce very thin sounding output which drastically effects the quality of sound from the speakers.
• Use microphones specific to the use. For example, an instrument mic has special characteristics that might not suit a vocalist.
• Microphones shouldn’t be pointed directly at or be close to the monitor speakers or loudspeakers. That causes feedback.
• Calculate the adequate number of mics needed. Very often, the mridangam bass side is not miced due to the lack in number.
• Try not to use 2 mics on the same sound source, as this might result in something called phase cancellation when done incorrectly, which negatively effects the tone of a sound source.
• Be aware of the pickup pattern of mics. A lot of poor quality mics pick up sound from unwanted directions, and cause feedback problems.
• Place mics at a proper distance away from the sound source. By placing it too close to the sound source, the loud parts will seem very loud. So making sense of this ‘proper’ distance will take some time and study to understand.
• Some mics might need a windscreen to prevent making a ‘pop’ sound, especially for vocals.
Purchase Suggestions
It is important to note that there are no absolute rules when it comes to microphone selection. It is an art and skill in itself. And also, there are hundreds of choices available in the market. But some common recommendations include: (Most of these mics cost between 4-6 thousand rupees each)
- Vocal Dynamic Mics: Shure SM58, Sennheiser e835, AKG D5, Audix OM2, Shure BETA 58A
- Instrument Dynamic Mics: Shure SM57, Audio-Technica ATM650, Audix I5, AKG D40
2. Stands
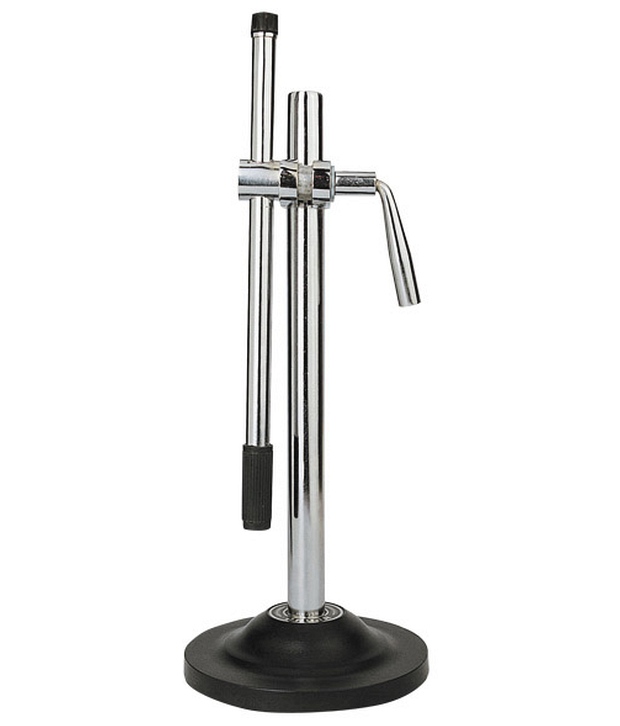
A stand is a mechanical device which allows the mic to be mounted and positioned in a desirable way, so that the sound is picked up well by the mic.They come in a variety of sizes, but can be categorized into three categories based on purpose. Full size ones (used when standing), medium ones (used while sitting on the floor), small ones (to capture very low height sound source, like a mridangam.)
Best Practices
Stands should be of adequate height. Low height stands often cause the vocalist to need to hunch. Similarly, if the stand used is too tall, it might be visually unappealing and difficult to adjust while seated.
- Stands should be sturdy and have a heavy enough weight so that they can stand steadily.
- Organizations should maintain spares as a last resort to fall back on when the usual stands malfunction.
- All the clamps and poles should ideally be rust free and free moving so that it can be adjusted without problem.
- The microphone clip should attach well to the head of the microphone pole. If the thread on either device has worn out, it should be replaced.
- Using adhesive tapes and other make shift measures to keep the mic and stand steady, should be considered only when there is no other option.
- Every sound source requires a stand. Often the mic used for the bass side of the mridangam doesn’t have a stand.
- Periodically check the condition of the stands.
Purchase Suggestions
Mic stands is a category for which there are only few options in the market. Check to see if the stands are sturdy and buy. As suggested before, it is a good practice to have a spare stand to use in case of a malfunction.
3. Audio Cables

Audio cables are used to connect the mics, speakers, mixer, musical devices etc. to one another so that the audio signal can be moved and manipulated as desired. Cables are an often overlooked component in the PA setup. Proper use of cables is equally easy to achieve or neglect, and the result either case can be dramatic. Apart from proper use, the thoughtful presence of cables in quantity and type is also important.
Cables come in two broad categories, balanced and unbalanced. Balanced cables have a shielding inside the cable which eliminates interference/noise problems that are caused in unbalanced cables. If the mic cable has XLR connectors like the one on the right, it is most likely a balanced cable
Typical path of audio cables:
- Microphone to mixer
- Mixer to Amplifier
- Amplifier to speaker
Best Practices
• The organization should carry with them phono/instrument cables and also a cable with 3.5mm cable to connect to the mixer. More and more artists carry amplification devices for their instruments or electronic tamburas, which they would wish to connect to the mixer.
• Cables should be wrapped properly after use. (Look into the over-under technique of cable wrapping). Just coiling/rolling up the cable can lead to loose connections within the cable.
• Having spares cables is a good idea, as they can go bad without any notice.
• Used balanced cables wherever possible to reduce chances of noise/interference.
• If you have cables with a loose connection, get the repaired soon instead of trying to manage with them always.
• Don’t use cheap electrical wire to connect the amplifier to speaker. Use speaker wire of proper gauge.
• Not all sound signals are the same. Understand the difference between mic level, line level and speaker signal; and use adequate cables accordingly.
• A cable with a loose connection is often caused by a bad connector. But the cable itself might still be very usable.
Purchase Suggestions
- Buy good quality cables, which will last you a long time.
- MX is a budget Indian brand for quality cables and connectors. If the finances allow for it, global brands like Neutrik and Amphenol can be considered.
- For the technically capable, you can buy loose cable and connectors separately and solder them yourself or by an electric repairman. This turns out to be much cheaper than buying ready-made cables.
4. Mixer
An audio mixer is a device that allows one to combine multiple audio signals into a unified output that can be sent out to the loudspeaker. Importantly, it allows us to manipulate each of the individual audio signals as desired. The mixer is arguably the most important component in shaping the output sound.
Using the mixer is a skill in itself, best understood by live sound engineers. But with some effort, the basics of live sound mixing can be learnt by amateurs as well. 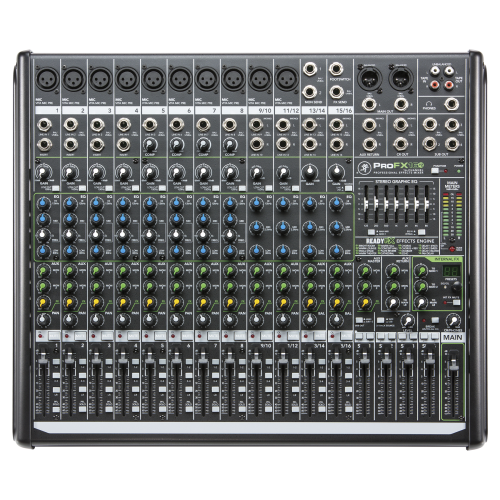
A typical mixer offers us many input and output options for shaping what kind of sound we want.
Inputs: | Outputs: |
| Microphone Instrument cables (from an amplified violin for example) Line level sources (like MP3 players, smartphones) Effects processors | Amplifiers Powered Loudspeakers Stage Monitors Headphones Effects processors |
Best Practices
As mentioned earlier, using a mixer is a skill. So directions to use a mixer is beyond the scope of this particular guide. So I will have to come up with a separate guide for mixing as well. Alternatively, you can use the manufacturer’s own detailed manual (which is provided typically with the mixer) or you can look up tutorials online.
Here are some general tips:
• Buy a mixer made by a reputed company (some brands are mentioned below).
• Familiarize yourself with all the knobs and buttons on the mixer. When the unexpected problem arises, you should know how to fix it.
• Set up your mixer in a logical manner, and know which mic is connected to which channel. (For example, if you want to alter the sound of the vocalist, you should know exactly what channel knobs to turn.)
• Buy a mixer with adequate number of microphone inputs. (I would recommend at least 8 microphone inputs). That way when they need arises, more microphones can be hooked into the mixer.
• Many mixers are capable of 2 (if not more) ‘mixes’. What the audience wants to hear is different from what the artists want to hear on stage.
Purchase Suggestions
- Given the importance of the mixer, you need to make sure that it is reliable. So stick with quality brands like Yamaha, Soundcraft, Mackie, Allen & Heath.
- Soundcraft EMP8 represents great value, at around Rs. 14,000
- Solicit the opinion of a professional for your needs, if needed.
5. Loudspeaker
Loudspeakers are components that convert an electrical signal into acoustic energy. As the name suggests, they produce sound at loud enough levels so that the entire audience can hear the sound sources.
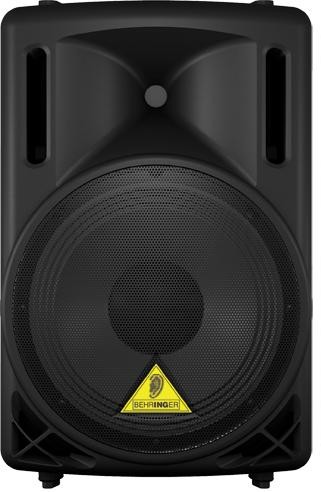
Powered Loudspeaker
Loudspeakers come in two primary varieties:
- Passive Loudspeakers: Needs to be powered using an amplifier.
- Powered Loudspeakers: (also called Active Loudspeakers). They come inbuilt with components like an amplifier and crossover.
Why should you prefer using Powered Loudspeakers?
Here is an analogy. Let’s say you wanted to buy a car, but you had to buy the body and the engine separately. You have hundreds of combinations to choose from, and have to make sure that the engine is able work together with the car in many respects. Most people wouldn’t have the technical expertise to make such judgements. They just want a vehicle that they can drive that gets them from place to place.
Buying a passive speaker is much the same. You need to understand basics of electrical measurements like power rating (watts), impedance values (ohms), distortion, wiring techniques, etc. Most lay people find this complicating, and it actually is. The only case in which I’d recommend loudspeakers to organizers is in the case of permanent installations in venues, where you have some expertise to help you with the setup.
It is far simpler to buy a Powered Loudspeaker that comes inbuilt with the amplifier and crossover, decided appropriately by the manufacturer. Using a powered speaker is no different than using computer speakers. You just plug in the audio signal and power cable, and turn on the speaker.
Best Practices
- Choose your loudspeaker based on the size of your venue and approximate audience size. If the loudspeaker is too weak (low in power), it won’t sound loud enough for the audience.
- Prefer using speakers in a stereo setup (where the signal of left speaker is different from signal of right channel). Just the way that we have two ears, it is more pleasing to hear stereo sound.
- Speakers need to work together as a group, so correct placement is key. If the speakers are not distanced and/or angled correctly, the effect is quite displeasing.
- Choose a reliable brand of loudspeaker, which usually ensures longevity and quality of sound. (suggestions below)
Purchase suggestions:
- Some reputed manufacturers of speakers are JBL, Mackie, Yamaha, QSC, and Behringer (to a lesser extent).
- Buy an appropriate stand for the speaker.
6. Monitor Speakers
Stage monitors (or floor monitors) are speakers for the performers on stage so that they can hear themselves. From the artists’ perspective, this is arguably the most overlooked component of the PA system. Like in the case of the loudspeakers for the audience, it is best to use a powered monitor speakers to keep things simple and reliable. Use only speakers specifically manufactured for the purpose of monitoring.
Best Practices:
- You need to be able to make a separate audio mix for the monitors (typically called monitor mix). The point of this mix is for the artists to hear themselves best.
- Changing the direction of the audience speakers to compensate for the lack of monitors is not the solution. It neither satisfies the need for the audience nor the performer.
- If possible, using more than one monitor speaker is recommended. Depending on the capabilities of the mixer, it is even better if each one of these speakers had their own mix. The mridangam artist might want to hear more of himself and less of the other artists for example.
- Given that the monitor speakers are close to the artist, they have to placed and mixed such that feedback problems are avoided.
- Indian classical music is performed seated on the stage. So place monitors such that they don’t obstruct the audience’s view of the artists. Using low-profile monitors helps too. The problem can also be avoided by having the artists sit on a raised platform.
Purchase suggestions:
- Manufacturers of loudspeakers also usually make monitor speakers.
- Buy low profile monitors that are not too tall, as that will obstruct the view.
So that concludes the PA System Guide. Despite my efforts in keeping things simple, there is quite a lot of material to be aware of, such is the nature of live sound. I’d be more than happy to clear any queries that you might have in the comments section below.
 Previous Post
I am helping to host an event for my church, and we are wanting to get a PA system. But none of us our experts in this area, and are wanting to know what we need to get. It’s good to know that one thing we need to get is a stage monitor so that the performers can hear themselves. That is something that I would not have thought about getting, but it makes senses to do so.
really you aren giving me best teahing about microphone many thanks v,anuradhav
Very useful, thanks
what mic would you recommend for violin (not attaching physically to the violin, but to a stand). I believe SM57 is more suited for Mridangam and drums and not for violin
Dynamics mics are typically used for the drums, but that doesn’t mean they would sound bad on other sources. The SM57 would make a fine microphone for the violin. It has a better response than a SM58. I find that condenser mics have a flat response in general. That said, so many mics could work for the situation. Ribbon, condenser or dynamic mics.